Tariff editor
Tariffs are charges or charges charged for the transportation of cargo between two locations or destinations. These tariffs serve as the basis for calculating transport costs and are set between shipping companies, logistics service providers and freight companies. Freight rates are often set in coordination with different modes of transport, such as trucks, trains, ships or planes.
Tariffs in shippingNET are price tables with dynamic columns (x-axis) and rows (y-axis). They are used in the calculations of the billing to calculate prices for individual services.
A typical example of a fare is the freight cost by weight and zone. In this example, the zones in the columns and the weight are staggered in the rows. For example, for a shipment with a freight weight of 5 kg, a scale of 0-10 kg can be defined. There is a price for each zone of this season.
Create plan
You can create tariffs in the Tariff Editor. The tariff editor, like each editor, is divided into several areas in order to form thematic focal points. In addition to entering the general basic information in the General area, you enter the Billing Bases and prices in the Amounts area.
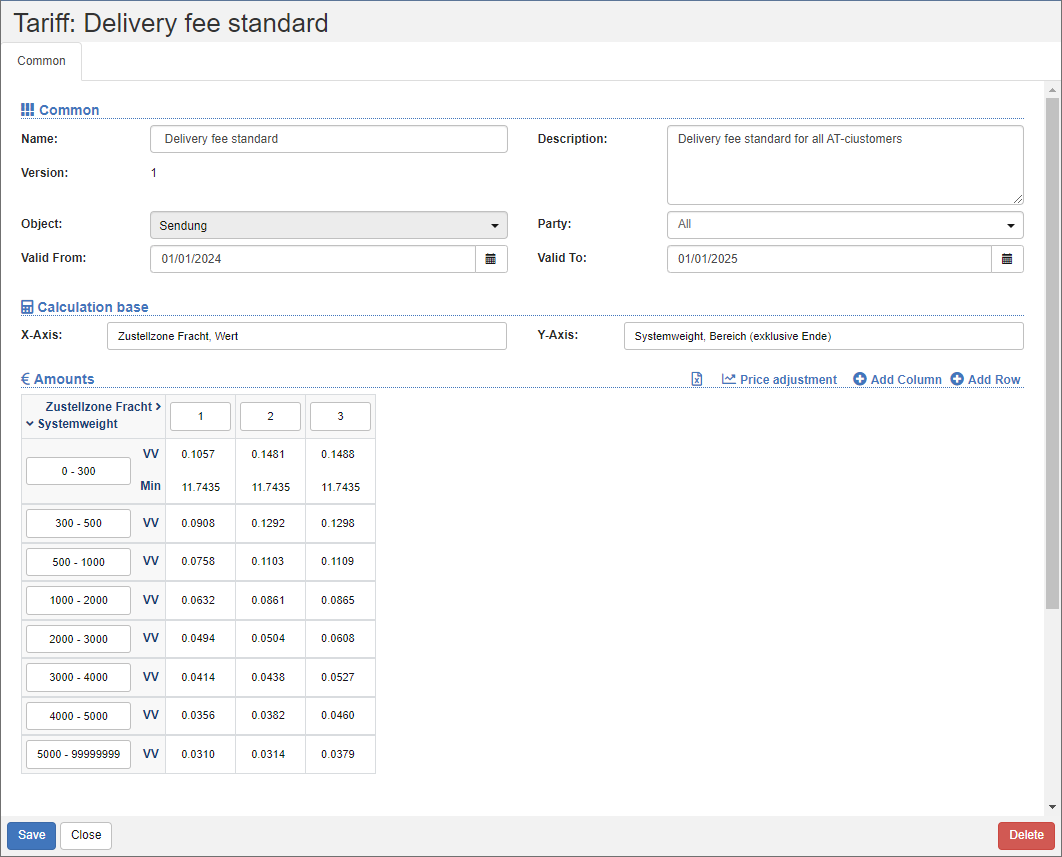
General
In this section you can see the most important information at a glance.
In the Name field, enter a descriptive name for the tariff. This name is required for the selection in the calculations.
In the Object field, specify what you want the rate to be used for. You can set general objects such as Transport, Shipment or Collo, or restrict the rate to apply only to delivery shipments or only to Pickup shipments.
In the Party field, enter which party you want the rate to apply to, starting from your billing department. This allows you to determine whether the rate should be applied for customer billing, freight billing or a general clearing.
Use the Valid from and Valid until fields to define the validity of the tariff. If an expired rate is applied to a costing, this will result in an error that will be caught in clearing control.
Accounting bases
In the Billing Basics section, you define the columns (X-axis) and rows (Y-axis) of the tariff. Select the desired billing basis for each axle, such as the zone or the chargeable weight. These two accounting bases are the input values for the calculation.
Amounts
In the Amounts section, store the values for each individual combination (cells) of the two axes.
Add or delete columns and rows
To add more columns or rows, click the action
If you want to delete a column or row, click on the label. A dialog opens. Select the action
Edit rows
Depending on the billing basis, you can set the limits and rules for the application.
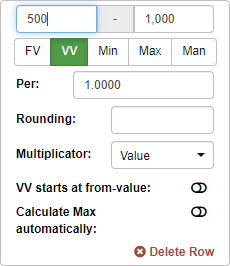
First, set the limits. This is the scope for the application of the tariff line. The input value must be between lower and upper limit.
Click on the green options to apply the corresponding functions, multiple selection is possible:
Fixed amount (FB): Specify a fixed base amount per cell. The amount will always be charged.
Variable Amount (VB): A variable amount per cell multiplied per size to be set. In this context, other settings are crucial: - Multiplier: Specify whether the variable amount is multiplied by the actual value, the minimum or the maximum limit. - Pro: The staggering of the actual value. For example, you can use it to define €15 per 100 kg. - Rounding: The rounding determines how many digits the calculation result is rounded to - VB from the lower limit: The lower limit is subtracted from the input value for the calculation. - Max Value Auto: Automatically calculates the maximum amount to ensure that the calculation result is capped.
Minimum Amount (Min): A minimum amount per cell that defines a minimum amount regardless of all calculations.
Maximum Amount (Max): A maximum amount per cell that defines a maximum amount regardless of all calculations.
Manual Entry: Forces a manual amount to be entered directly from the settlement object.
Warning
Your changes will not be saved until you click the Save action in the action bar below the editor. If you leave the editor without saving, your changes will be lost!
Pricing
With the price adjustment, you can change the amounts of the tariff. By selecting the cells, you determine which cells will be priced.
Procedure:
- In the list action bar, click the adjustment.
- In the Price Adjustment section, enter the percentage adjustment and rounding.
- By default, all cells are selected. Alternatively, you can select individual cells. To select specific cells, hold down the CTRL key. The price adjustment will only be applied to the selected cells.
- Click the Save action.
Importing or exporting amounts
To make it easier to edit the tariffs, export the data to an Excel file. Then edit or add to the data. After that, you can import the data again.